In this article we’ll enhance the Angular Todo app to manage creating and updating tasks via our Django REST API.
This post is part of the Dockerized Django Back-end API with Angular Front-end Tutorial. Check out all the parts of the tutorial there.
In the last part of the tutorial, we’ve learned how to connect an Angular app to a REST API. In this blog post, you’ll learn how to create and update tasks from the Angular app while interacting with the API.
To get the code to where we left off in the last blog post, use:
$ git checkout v1.8
To input the data related to our task, we’ll use Angular’s reactive forms. These are simply HTML forms that have their state handled as a realtime stream. They’re built around observable streams, meaning that form inputs and values are supplied as streams.
In contrast to template-driven forms, we won’t be binding object models using directives such as ngModel. Generally, reactive forms are more scalable and testable.
Let’s also list three important classes that come about when dealing with reactive forms:
FormControl – represents an individual form input, checkbox, radio button, etc.FormGroup – a group of form fields that can be handled and validated together.FormBuilder – a easier way to build FormGroups.
Creating Tasks Using POST Requests
In this section, we’ll handle POST requests by following a similar pattern to handling GET requests.
First, create a method in src/app/api.service.ts for handling POST requests:
Next, let’s enhance our TaskList component to handle task creation. We can create a separate component for this functionality, but for simplicity, let’s just use the existing TaskList component.
Import the ReactiveFormsModule into the src/app/app.module.ts file.
After, we need to make the following additions in src/app/task-list/task-list.component.ts.
First, we import the FormGroup and FormBuilder classes from @angular/forms.
import { FormGroup, FormBuilder } from '@angular/forms';
Then, we inject the FormBuilder service in the constructor:
constructor(private apiService: ApiService, private form_builder: FormBuilder) { }
After, we use the FormBuilder to define a new FormGroup to handle our task details:
Here, we’re setting empty strings as default values for our title and content.
Next, let’s also bind the FormGroup to the HTML in the src/app/task-list/task-list.component.html file by adding the following:
Here we map the input fields to the form controls part of the task_form FormGroup.
You’ll also notice how we’ve added an ngSubmit event listener to the form tag. Basically, the FormGroup directive listens for the submit event emitted by the form and emits an ngSubmit event. We’ve bound this event to the onSubmit() callback function.
Let’s go ahead an implement the onSubmit() function in src/app/task-list/task-list.component.ts:
We access the form data directly using this.task_form.value and POST it to our DRF API using the apiService.
When we receive the response, we log it to the console and call getTasks() again. We need the latter to “refresh” our list of tasks, otherwise a newly added task won’t be seen by the user.
Here’s how the src/app/task-list/task-list.component.ts looks at the moment:
You can see the additions in my git commit or to get the repo to this point use:
$ git checkout v1.9
If you go to the app page in the browser, you’d notice that although you’re able to submit empty tasks (empty title and content), you get back an error in the console, since the API doesn’t accept empty values for the task.
To fix this, we need to add some error validation to our form. We do this by importing Validators from @angular/forms in src/app/task-list/task-list.component.ts:
import { FormGroup, FormBuilder, Validators } from '@angular/forms';
Next, we add the required validator to the form controls after building the form group:
Lastly, in src/app/task-list/task-list.component.html, we’ll add a [disabled] directive to our Add Task button to disable submission when the form is invalid (i.e. either title or content are empty):
<button type="submit" [disabled]="task_form.invalid">Add Task</button>
Updating and Deleting Tasks Using PUT and DELETE Requests
In this section, we’ll implement functionality for updating and deleting our Todo items.
First, let’s add two more methods inside src/app/api.service.ts to send PUT and DELETE requests to the API:
Handling DELETE Requests
Next, add a button for deleting a task within the *ngFor loop in src/app/task-list/task-list.component.html:
<button type="button" (click)=deleteTask(task.id)>Delete</button>
You’ll see that this button has its click event mapped to a deleteTask() method to which we pass the task ID. Let’s create the deleteTask() method in src/app/task-list/task-list.component.ts:
In this method, we just use the apiService to send the DELETE request. We also call getTasks() to update the list of tasks.
This takes care of the DELETE requests, so you can test that it works correctly.
Handling PUT Requests
To handle updates, go back to src/app/task-list/task-list.component.html and modify as follows:
There are quite a few changes here so let’s explain a bit further.
Firstly, since we want to be able to edit the task details, we need to make use of a form. Here, we’re using a template-driven form. Using the [(ngModel)] directive, we’re binding the form input fields to the properties of the local task variable.
Next, we’re also binding the form submit event to the updateTask(task) method, which we’ll implement in a bit.
Lastly, you’ll also notice that by default, the input fields are not editable. This is achieved using the [disabled]="!task.isEditable" directive. To make the fields of a task editable, the user needs to click the Edit button you can spot in the code.
When the Edit button is clicked, the task.isEditable property becomes true and the Save button takes place of the Edit button. The user can then edit the contents of the task. When done, the user clicks the Save button.
Since the Save button is of type="submit", clicking it will trigger a submit event which would then trigger the updateTask(task) method.
Now, it’s time to implement the updateTask() method in src/app/task-list/task-list.component.ts:
Lastly, let’s not forget that since our app is now also using template-driven forms, we need to add FormsModule to our imports in src/app/app.module.ts:
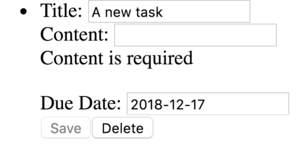
Let’s also add some nice validation to our new template-driven form in src/app/task-list/task-list.component.html:
If it suddenly looks too complicated, don’t worry, you’ll understand in a second!
First, you’ll notice that we’ve added the required attribute to our input fields so empty fields would be invalid.
Secondly, our form tag now has a new template variable #f="ngForm". The f variable now maps to the NgForm directive that manages the form. This directive is now implicitly introduced and we can use it to see if all of the form properties are valid.
So, we use the f variable to see if the form is invalid. If it is, then we disable the Save button using [disabled]="f.form.invalid".
Thirdly, we now output a message to let the user know if a field should be filled in. For example:
<div *ngIf="title.invalid && title.errors.required">Title is required</div>
We’ve created a template reference variable title using #title="ngModel" to access the Angular control of the title’s input box. If validation fails for the input field, then the supporting message is generated.
Get the code to this point with:
$ git checkout v1.10
And that’s it for this tutorial!
By the way, I realise the UI looks pretty dull. I’ll probably write a blog post on how you can use Angular Material to bring the interface into the 21st century.
Summary
In this part of the tutorial, we’ve learnt how to handle creating, updating, and deleting tasks in Angular. Moreover, we got introduced to both template-driven forms and reactive forms and we saw how we can do form validation in both situations.
In the next part, we’ll see how we can use Auth0 to secure our Django REST API.