In this blog post, I promise you’ll learn how to build, test and deploy a simple microservice API (Application Programming Interface) in the cloud using the Bottle Python framework and the Google Cloud Platform.
Why Microservices?
I believe every software developer should be aware of a certain trend in the industry.
Tech companies are moving from monolithic models to microservice architectures.
The Google Trends chart below clearly shows the growing interest in this approach over the last five years.
The idea behind a microservice architecture is that instead of building a monolithic application, you develop a collection of loosely coupled components. Together, they make up the overall system.
Microservices provide a number of advantages, such as:
- modularity – microservices have a focused purpose, which reduces their complexity, making them easier to understand and maintain.
- scalability – each microservice can be scaled independently, depending on its own needs, using extra computing power.
- deployment – microservices can be deployed independently of each other, therefore teams don’t need to coordinate for changes at local/service level.
- flexibility – developers can choose the most suitable technologies for the task at hand, since the service only has to honour its API specification.
The components communicate with each other using standardised APIs, usually REST (Representational State Transfer) APIs.
By the end of this post, you’ll have a good starting point for implementing your own microservice APIs.
API Architecture
Here are the three high-level steps you’ll perform:
-
Implement your microservice API using the Bottle Python framework.
-
Test your API locally using Postman.
-
Deploy your API to the Google Cloud Platform.
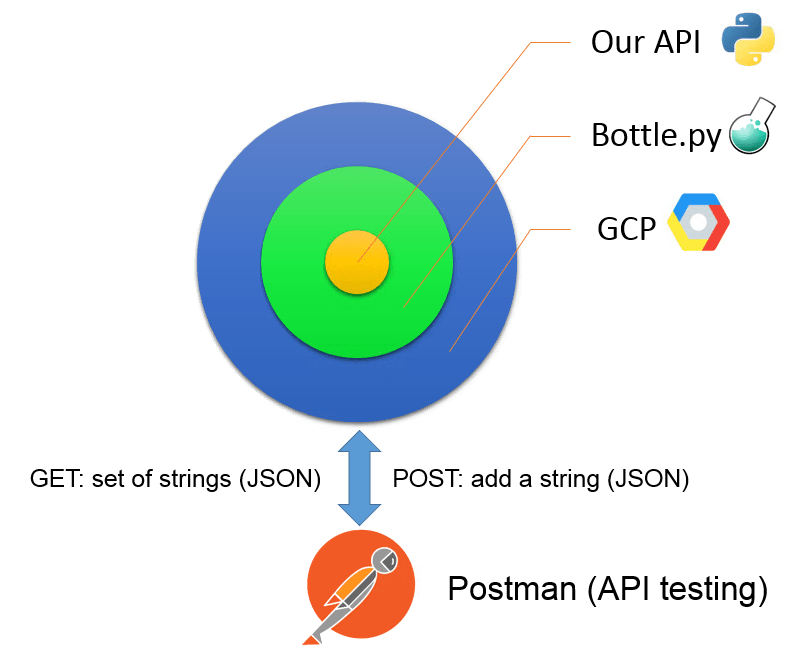
API Architecture
API Development Tutorial
0. Prerequisites
I’ll assume you’re using Linux as your development operating system.
If you’re on Windows, spin up an Ubuntu virtual machine or go over this guide to set up your computer for Python development on Windows.
0.1 Install Bottle
First, proceed to install Bottle, a micro web-framework for Python. It’s fast, lightweight and simple to use, therefore excellent for quick prototyping.
To install Bottle, you’ll need pip and virtualenv. Most likely these tools are already installed on your system.
Create a directory for your project, navigate to it in a terminal and enter:
This will create an isolated Python environment where you can hold all of your project’s dependencies.
Next, activate the virtual environment and install Bottle using:
0.2 Install Postman
Secondly, download and install Postman. This is a free application for easy API development and testing.
If you’re on Ubuntu, use the instructions from this Stack Overflow answer.
0.3 Install the Google Cloud SDK
Thirdly, install the Cloud SDK. Google Cloud Platform is a cloud computing platform similar to Amazon Web Services (AWS). Their free tier without a time limit is great for experimentation.
To install the SDK, follow the Google Cloud SDK documentation. If you’re on Ubuntu, use the instructions here.
As you’re implementing the API in Python, make sure to also install the additional google-cloud-sdk-app-engine-python component listed on the mentioned page.
1. API Development with Bottle
Initially, you’ll code your API independently from the Google Cloud Platform. In your project directory, create a new file called main.py with the following contents:
In the above code, app is an instance of the Bottle class representing your web application.
The run() call on the last line starts Bottle’s built-in development server on localhost port 8080.
If you execute the script and visit http://localhost:8080, you should see the Hello! message.
The @app.get('/') decorator maps HTTP GET requests at the root directory to the hello() function.
1.1 GET – Request Data
Let’s implement our simple microservice API functions. For the purpose of this tutorial, our interface will either retrieve a set of strings from the server (GET request) or add a string to that set (POST request).
Add the following code to main.py for the GET request:
For illustration purposes, my_fruits is a Python set representing the strings on the server. If you’re designing a more complex application, you’d want to use a database.
The json.dumps() method serialises the Python dictionary containing my_fruits to a Javascript Object Notation (JSON) formatted string.
If you visit http://localhost:8080/api, you should see an empty fruits list, since you haven’t added anything to the list yet.
Because you have modified the app, you might need to restart the Bottle server to reflect the changes.
1.2 POST – Submit Data
Next, it’s time to implement the logic for adding an item to the my_fruits set. To achieve this, a POST request will be sent to the server containing the new entry in JSON format.
Add the following code to main.py:
In order to access request data, you’ll use the request object provided by Bottle.
Providing that the request header is of application/json content type, the request.json property will hold the parsed content of the request body. If the property returns a Python dictionary, the value associated with the fruit key can be looked up using data["fruit"].
After, the item is added to the my_fruits set.
Lastly, the function returns the newly added item as a confirmation.
Error Handling
It is good practice to add error handling to your app. Modify your code as follows:
If the decoding of the JSON request fails, then a ValueError exception will be raised.
Also, if the fruit key couldn’t be found in the data dictionary, then a KeyError exception will be raised.
We handle both of these exceptions by returning a HTTP response of 400 Bad Request to the client.
Finally, we are now ready to test our API!
2. API Testing with Postman
Go ahead and open Postman.
On a new tab, select POST from the drop-down request menu.
Next, enter http://localhost:8080/api as the request URL. Then, click the Body subtab and choose raw. To the right of this, select JSON (application/json) from the drop-down list instead of Text.
After, enter the following JSON body in the text field below:
Click Send. In the bottom of the screen, you should see the returned JSON string, i.e. {"fruit": "orange"}.
If you now visit http://localhost:8080/api or select GET from the Postman request menu, you should see that you have successfully added orange to the my_fruits set.
Below you can see a screenshot of the Postman settings:
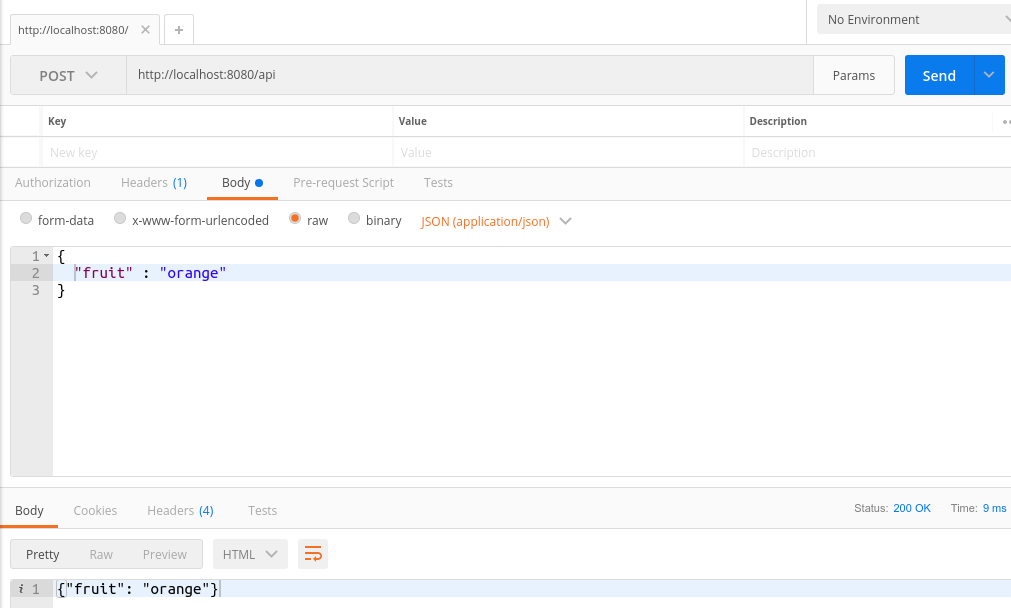
JSON POST request in Postman
Let’s now proceed to deploy our microservice API to the Google Cloud!
It’s important to mention that Google Cloud uses its own web server for handling requests to your app. That being the case, you need to comment out the last line of your main.py file (app.run(host="localhost", port=8080)). You no longer need to use Bottle’s built-in server.
Before you’re ready to make your app live, you need to create 3 configuration files required for Google Cloud in your project’s root directory:
-
requirements.txt – specifies your app’s dependencies, namely Bottle.
-
appengine_config.py – points Google Cloud Platform to the location where third-party libraries used by your app are stored.
-
app.yaml – configures some general parameters for Google Cloud.
3.1 requirements.txt
Add the following line in requirements.txt:
This states that you want to use the latest stable version of the Bottle framework, currently 0.12.13. Next, create a new lib directory in your project’s directory. Then, from the terminal, run:
The command above will install Bottle in the lib directory.
3.2 appengine_config.py
In appengine_config.py, insert the following code:
By adding the above, Google Cloud will pick up the extra libraries found in the lib directory, i.e. Bottle.
3.3 app.yaml
Lastly, enter this code in app.yaml:
Here, you specify that the runtime environment for your application is Python version 2.7.
The version of the API in the Python runtime environment is set to 1, the only one available at the moment.
You tell Google Cloud if your application can handle concurrent requests by setting the threadsafe property to true or false. As the Python set data structure isn’t thread-safe, we’ve set this to false.
Finally, the handlers property maps all URLs to the Bottle app application in main.py.
Deploy using a Google Cloud Project ID
Navigate to the Google Cloud Console.
Next, click the project drop-down menu next to the logo. Then, click the big “+” to create a new project. Enter a project name and a project ID.
This is the final command you need to run, I guarantee you. Execute the following from your project’s directory:
Select a server region to host your app and you’re done.
Congratulations! Your API is now live at https://your-project-id.appspot.com.
Summary
In conclusion, the three main skills you’ve learned are:
-
Developing a simple microservice API with the Bottle Python framework.
-
Testing your API using Postman.
-
Deploying your microservice app to production using the Google Cloud Platform.
GitHub
You can find the code for this blog post here: https://github.com/dnstanciu/api-bottle-gcp