This blog post will teach you how to secure an Angular application using Auth0, an authentication provider.
This post is part of the Dockerized Django Back-end API with Angular Front-end Tutorial. Check out all the parts of the tutorial there.
In the last part of the tutorial, we’ve learned how to secure our Django API using Auth0. In this blog post, you’ll learn how to secure the Angular frontend by requiring users to authenticate using Auth0.
To get the code to where we left off in the last blog post, use:
$ git checkout v1.11
Integrating Auth0 with an Angular App
In this section, you’ll add Auth0 authentication to your front-end Angular app.
Creating an Auth0 Client
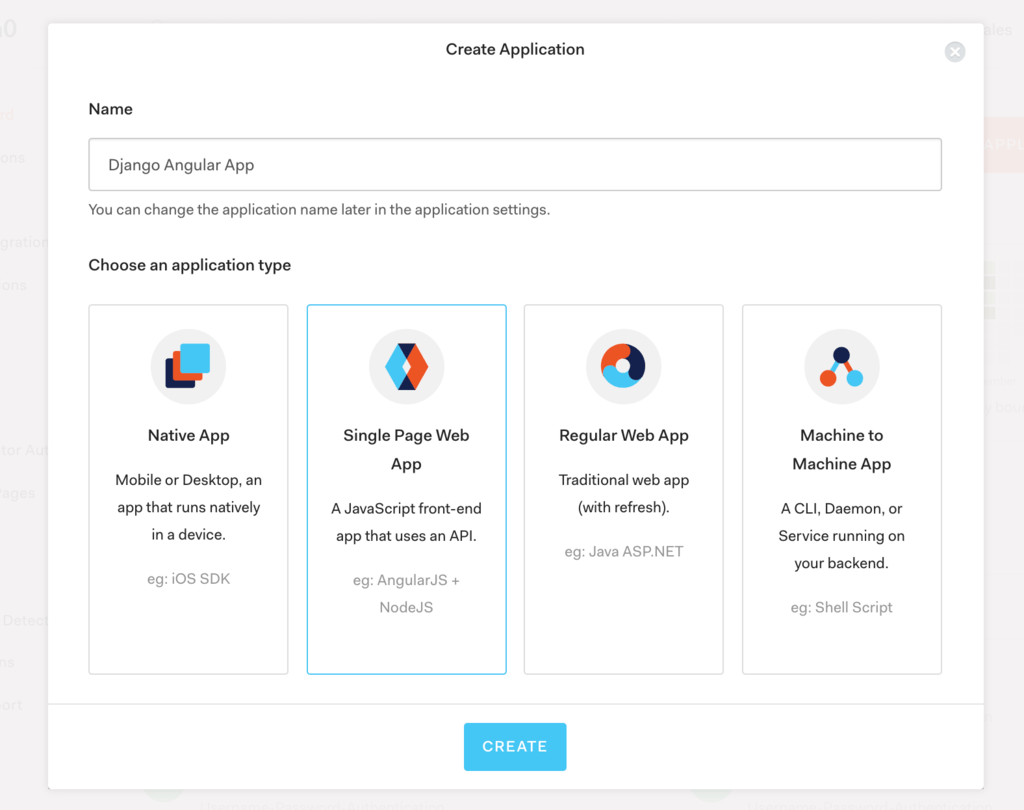
To model the Angular app in Auth0, we need to create an Auth0 client. Go to the Auth0 dashboard and click New Application. From the pop-up, name your app (e.g. Django Angular App) and select Single Page Web App.
After clicking Create, you’ll get to your app’s page in Auth0. Click the Settings tab.
Adding the Callback URL
Next, we need to whitelist the callback URL for our app. A callback URL is simply the URL in your app where Auth0 redirects an user after they’ve authenticated.
In the Settings page, go to the Allowed Callback URLs and add http://localhost:4200/callback and http://localhost:8080/callback. This way, we can handle logins from the app running on both the Docker container or the ng serve development server.
Observation: When deploying to production, we’ll also need to add the production URL here. Additionally, if we add HTTPS to the stack, the URLs need to have https:// in front.
Adding the Logout URL
Since you’re on the Settings page, let’s also add the following logout URLs in the Allowed Logout URLs section: http://localhost:4200 and http://localhost:8080.
These URLs are used by Auth0 to redirect the user after logging out from Auth0.
Click Save Changes at the bottom.
Adding the Auth0 Environment Configuration
To make things easier for ourselves, let’s add the Auth0 configuration details to src/environments/environment.ts with the auth property as follows:
Creating the Authentication Service for Auth0
Next, let’s do the actual Auth0 integration into our Angular app.
First, install the auth0.js library using npm from the angular-app directory:
$ cd angular/angular-app
$ npm install auth0-js
Then, create an authentication service. Inside angular-app, generate a new service by running:
$ ng generate service auth/auth
Now, inside the newly generated src/app/auth/auth.service.ts file, add the code:
In order to authenticate users, we’ll use Auth0’s login page. According to Auth0, this is the most secure way of signing up and authenticating users as it prevents man-in-the-middle attacks.
Protecting Routes with Route Guards
In this section, we’ll see how we can protect routes within our app so users would be required to authenticate in order to access different parts of the application.
In Angular, route guards are interfaces which tell the Angular router whether or not it should allow navigation to a requested route.
Let’s go ahead and create an authentication route guard that will check if a user is logged in before allowing access to the route. Run the following from the angular-app directory:
$ ng generate guard auth/auth
Open the generated src/app/auth/auth.guard.ts and modify as follows:
Here, you can see that our AuthGuard implements the CanActivate interface. Basically, if this guard returns true, then navigation can continue. If it returns false, then navigation is cancelled.
To actually add the route guard to a route, we need to modify the src/app/app-routing.module.ts. This file was generated when we created the Angular project with ng new, and we were asked if we want Angular routing.
Let’s modify our app-routing.module.ts file as follows:
Here, we’ve created a new route /tasks. The route maps to the TaskListComponent and is protected by the AuthGuard route guard. Notice that we’ve also added the AuthGuard to our providers array.
Lastly, we’ve also added a mapping from the /callback route to the CallbackComponent which we’ll create in the next section.
Creating the Callback Component
In this section, we’ll build the callback component. This component should be activated when the http://localhost:4200/callback route is called. Specifically, it should process the redirect from Auth0 after the user authenticates.
Let’s create the component by navigating to angular-app and running:
$ ng generate component callback
Edit the src/app/callback/callback.component.ts as follows:
After redirection, the user’s URL contains a hash fragment with their authentication information. The handleLoginCallback method in AuthService processes their hash.
Let’s also edit the template for this component in src/app/callback/callback.component.html by replacing the file contents with:
Allowing the User to Authenticate
Next, let’s update our root component (i.e. AppComponent) to add functionality related to authentication. We’ll add a Login and Logout button, and a link to navigate to our tasks.
First, inject the authentication service in the root component by editing the src/app/app.component.ts file as follows:
Next, edit the HTML template of the root component by editing src/app/app.component.html as follows:
We now have Login and Logout buttons that appear selectively, depending if the user is logged in or not. The user can thus login, get redirected to the Auth0 domain, authenticate, and get redirected back to the /callback URL.
Also notice that the navigation link to our tasks is only rendered when the user is logged in. This is achieved using the *ngIf="auth.isLoggedIn logic.
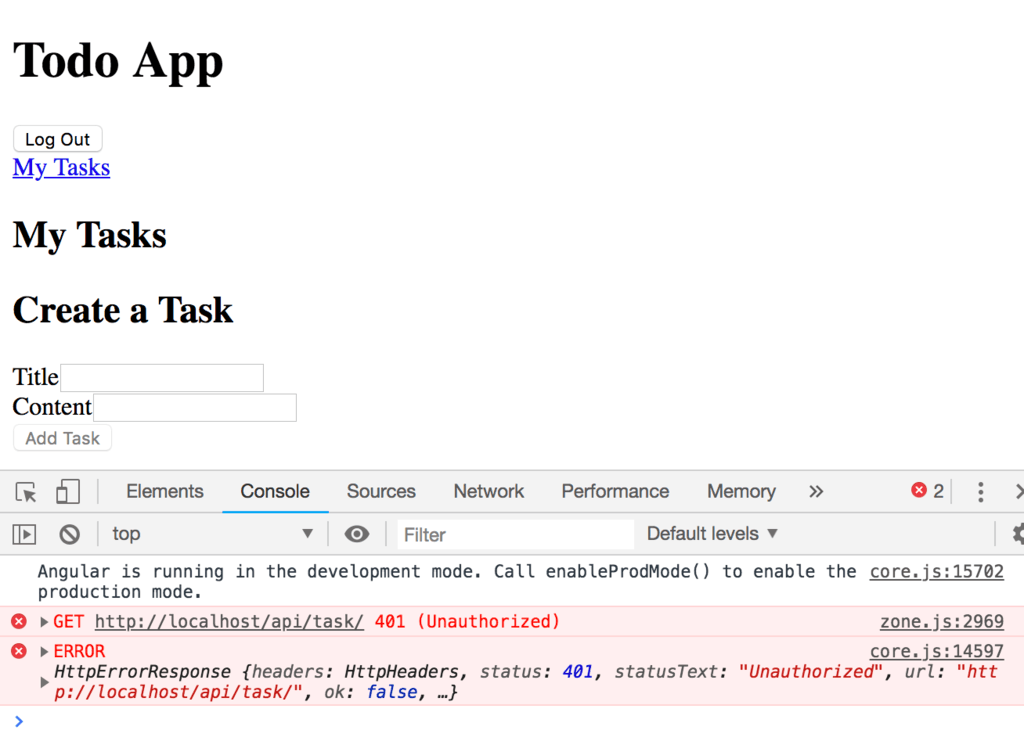
If the user logs in and clicks the My Tasks link, they don’t get any tasks back from the API. The issue is that we’re not supplying our access token when sending the GET request.
Therefore, we need to modify our src/app/api.service.ts file as follows:
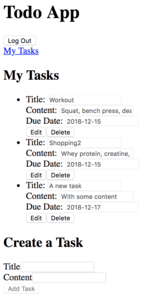
Here, we’ve simply added an Authorization header with the Bearer scheme to all of our requests. We get the token from the authentication service we’ve created previously.
If you now access the My Tasks link again, you’ll see that we can fetch the tasks:
To make the code changes easier, see my git commit here or checkout the code at this stage using:
$ git checkout v1.12
The obvious problem now is that a user can access and edit all the tasks in the database, not just the ones created just by that user. To solve this problem, we need to add object level permissions in the Django REST framework. We’ll address this in the next part of the tutorial.
Summary
In this tutorial, we’ve learnt how to secure an Angular app using Auth0 and JWT authentication. We’ve also seen how we can now access the API back-end based on the Django REST framework using the access token from Auth0.
In the next part of the tutorial, we’ll look into object level permissions and how we can restrict the user’s access to only his/her tasks.
Credit: For this tutorial, I used the following resource: