This blog post will teach you how to secure a Django REST Framework (DRF) API using Auth0, an authentication provider.
This post is part of the Dockerized Django Back-end API with Angular Front-end Tutorial. Check out all the parts of the tutorial there.
In the last part of the tutorial, we’ve learned how to manage the tasks of an Angular Todo app via an API. In this blog post, you’ll learn how to secure the API by requiring users to authenticate to access their data. For this, we’ll employ JWT authentication and use Auth0 as an authentication service.
To get the code to where we left off in the last blog post, use:
$ git checkout v1.10
What is Authentication?
First, let’s define what we actually mean by authentication. According to the DRF documentation, authentication is the process by which we associate an incoming request to a set of identifying credentials, such as the user the request came from, or the token that it was signed with. It’s important to know that:
Authentication by itself won’t allow or disallow an incoming request, it simply identifies the credentials that the request was made with.
Authentication runs at the very start of the DRF view, before checking if the user is permitted to make the request.
What is JWT?
JWT means JSON Web Token and it basically represents a JSON object for holding claims. It’s a token-based authentication scheme and it doesn’t require you to save the token in a database.
You can read more about this standard here: RFC 7519.
A nice tool for decoding tokens can be found at JWT.io.
Creating an Auth0 API
Auth0 is an authentication provides that offers a free tier that includes registration for up to 7000 users.
Let’s first create an Auth0 API for our application. Create an account with them and go to the Auth0 dashboard. In the APIs section, click Create API. Enter the required details.
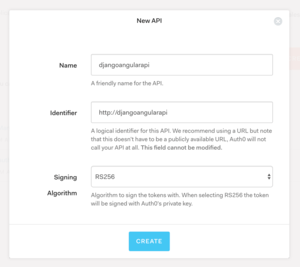
You can put in the following details:
Click Create and we can proceed.
Integrating Django with Auth0
In this section, we’ll secure our Django REST framework API using Auth0.
For handling JWT authentication, we’ll use the djangorestframework-jwt package.
Add the following packages to your django/requirements.txtfile:
Next, add rest_framework_jwt to the list of INSTALLED_APPS in django/todoproj/settings.py:
After, add the following definition at the end of the same settings.py file:
Here, we by default require users to be authenticated to access any API views. This permission setting can be overridden on an individual view level.
Next, import the following in your settings.py files:
Lastly, add the following code snippet at the end of settings.py:
Notice there are a couple of placeholders that you need to substitute. Replace AUTH0_DOMAIN with your own Auth0 domain and API_IDENTIFIER with the API identifier you’ve chosen in the previous section.
Also notice that JWT_PAYLOAD_GET_USERNAME_HANDLER is set to a custom method, namely jwt_get_username_from_payload_handler(). Our custom method simply maps all Auth0 users to a Django user in our database.
The idea here is that we’re letting Auth0 handle all user-related information such as login data or profile info. We’re not storing users in our own Django database. That custom method just tells djangorestframework-jwt that the authenticated user is auth0user.
Creating the auth0user
For Django to conclude that the user is authenticated, the auth0user has to actually exist in the Django database. We can create this user using the Django admin interface or better yet, using a migration file as follows below.
Build the Docker images with docker-compose build, spin up the containers using docker-compose up, and connect to the Django container using docker exec -it dj bash. Create an empty migration file by running:
$ python manage.py makemigrations --empty todoapi --name auth0user
Then, replace the contents of the the newly generated file todoapi/migrations/0003_auth0user.py with:
Next, run migrate to create the auth0user user:
$ python manage.py migrate
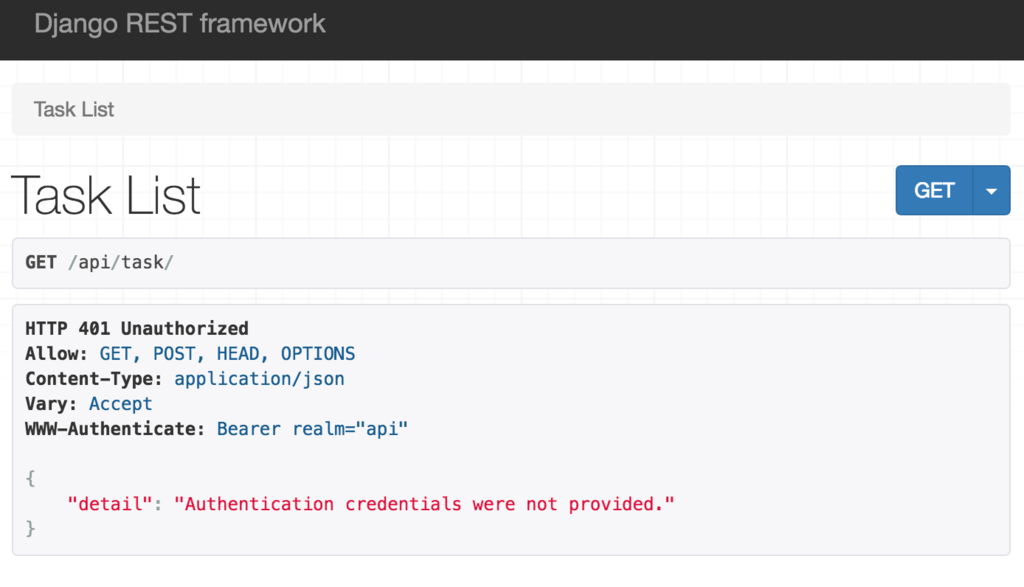
If you now go to http://localhost/api/task/, you’ll see we’re no longer allowed to access the list of tasks.
Testing JWT Authentication with Postman
In this section, we want to see that we can retrieve the list of tasks from the API by providing a test JWT token via Postman.
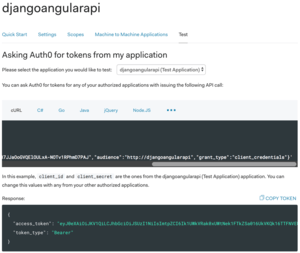
First, go to your API’s dashboard in Auth0 and select the Test tab. You can get the test token by clicking COPY TOKEN.
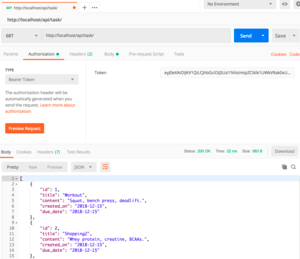
Next, open Postman and enter http://localhost/api/task/ for the request URL. Choose GET for the request type.
Then, click the Authorization tab and from the TYPE drop-down select Bearer Token.
In the Token box on the right, paste the test token you got from Auth0.
Lastly, press Send. At the bottom of the screen, you should see the dummy tasks returned from the API as in the screenshot below:
Get the code to this point using:
$ git checkout v1.11
Summary
In this part of the tutorial, we’ve secured our Django REST framework API using JWT authentication provided by Auth0.
In the next part of the tutorial, we’ll also add authentication on the client-side, for our Angular app.
Credits: For this tutorial, I used the following resources: